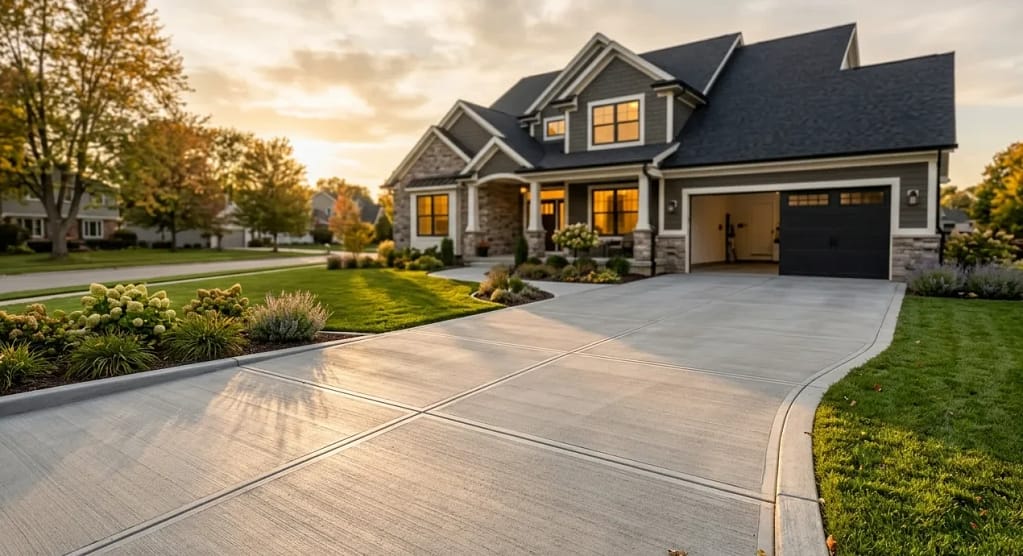
There’s a moment every homeowner experiences when standing at the end of their crumbling driveway, calculator in hand, wondering whether they’re about to make an $8,000 mistake or an $8,000 investment. Over two decades in the pavement industry, I’ve stood beside hundreds of homeowners in exactly that spot — and the answer almost always comes back the same: when a concrete driveway is done right, it’s one of the smartest decisions you’ll ever make for your property.
I’ve personally overseen installations ranging from simple suburban driveways to elaborate stamped concrete approaches on high-end estates. I’ve also ripped out far too many DIY disasters and contractor shortcuts that cost homeowners double what they would have spent doing it properly the first time. This guide distills everything I know into one place — the real costs, the installation process, the common mistakes, and how to protect your investment for decades to come.
Whether you’re comparing a concrete driveway vs asphalt, planning a brand-new installation, or trying to understand why your existing slab is cracking, you’ll find straight answers here — no fluff, no sales pitch.
📋 In This Guide
- Why a Concrete Driveway Is Worth the Upfront Investment
- Concrete Driveway Cost: What You’re Actually Paying For
- Concrete Driveway Installation: The Nine-Phase Process
- Concrete Driveway Thickness: Getting the Spec Right
- Concrete vs Asphalt Driveway: The Real Comparison
- Stamped Concrete Driveways: When Aesthetics Matter
- Concrete Driveway Maintenance: Protecting Your Investment
- 8 Common Mistakes — and How to Avoid Them
- DIY vs Professional Installation
- How Long Does a Concrete Driveway Last?
- Frequently Asked Questions
Why a Concrete Driveway Is Worth the Upfront Investment
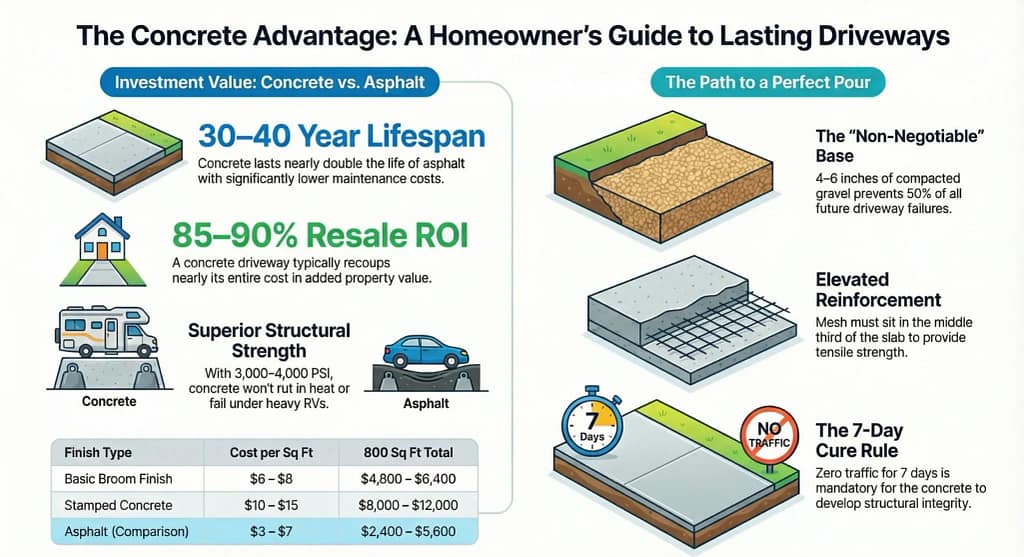
Let’s tackle the elephant in the room first: yes, concrete costs more upfront than asphalt. For a standard two-car driveway measuring roughly 800 square feet, you’re looking at $4,800 to $9,600 for concrete compared to $2,400 to $5,600 for asphalt. On paper, that gap looks significant. In reality, once you factor in lifespan, maintenance frequency, and long-term repair costs, concrete wins almost every time.
Here’s a quick way to think about it: a properly installed and maintained concrete driveway lasts 30 to 40 years, sometimes longer. An asphalt driveway typically needs full replacement every 15 to 20 years — and during that time, you’re paying for sealcoating every two to three years, crack repairs, and pothole patching. Over a 35-year period, a homeowner with asphalt can easily spend $6,000 to $12,000 more on maintenance than their neighbor with concrete.
Beyond the financial math, concrete brings structural advantages that matter over time. Its compressive strength — typically 3,000 to 4,000 PSI — means it won’t rut under heavy vehicles, won’t go soft in extreme summer heat, and won’t be damaged by gasoline or oil drips the way asphalt can. If you own an RV, a boat trailer, or a heavy-duty truck, concrete isn’t just a preference — it’s often a necessity.
⚡ Key Facts at a Glance
- Lifespan: 30–40 years (vs 15–20 for asphalt)
- Cost: $6–12/sq ft installed (basic to decorative)
- Compressive strength: 3,000–4,000 PSI
- Curing time: 7 days before light traffic; 28 days for full strength
- Minimum thickness: 4 inches (6 inches for heavy vehicles)
- Control joints: Every 10–15 feet; depth = ¼ of slab thickness
- Base requirement: 4–6 inches compacted gravel — non-negotiable
- Property value: Typically recoups 85–90% of cost at resale
💡 Pro Tip: Visit homes in your neighborhood that have had concrete driveways for five to ten years. Knock on doors and ask about their experience. Real homeowner feedback from your local climate and soil conditions is worth more than any online article.
Concrete Driveway Cost: What You’re Actually Paying For
One of the most frequent questions I hear is some version of “why does concrete cost so much?” The short answer is that you’re not just paying for the concrete itself — you’re paying for precise preparation, skilled labor, and equipment needed to get it right. Here’s how the numbers typically break down.
Standard Installation Costs
Basic broom-finished concrete driveway installation runs $6 to $8 per square foot installed. For a typical 800-square-foot two-car driveway, total installed cost lands between $4,800 and $6,400. That price includes excavation, a compacted gravel base, concrete placement and finishing, and basic control joint cutting.
What it doesn’t include: removal of an existing driveway ($1 to $4 per square foot depending on material), permit fees ($50 to $500 depending on your municipality), drainage systems if needed ($500 to $2,000), or any decorative upgrades.
Decorative and Premium Options
Stamped concrete driveways — patterns mimicking slate, cobblestone, brick, or flagstone — cost $10 to $15 per square foot. Integral color adds $1 to $2 per square foot, while acid staining adds $2 to $4. Exposed aggregate finishes run $8 to $12 per square foot. Decorative borders with contrasting colors or materials add $10 to $20 per linear foot.
For a fully decorated 800-square-foot driveway with stamping, color, and a defined border, budget $8,000 to $12,000 or more. The return comes in dramatically elevated curb appeal and, in many markets, a measurable bump in appraised property value.
Thickness and Reinforcement Upgrades
Standard residential driveways are poured at 4 inches thick. If you have heavy vehicles — RVs, large trucks, boat trailers — upgrade to 6 inches. That adds $2 to $3 per square foot, or roughly $1,600 to $2,400 for a full driveway. It sounds like a lot until you compare it to the $4,000 to $8,000 it costs to replace a slab that cracked under loads it was never designed for.
| Finish Type | Cost per Sq Ft | 800 Sq Ft Total |
|---|---|---|
| Basic broom finish | $6 – $8 | $4,800 – $6,400 |
| Exposed aggregate | $8 – $12 | $6,400 – $9,600 |
| Stamped concrete | $10 – $15 | $8,000 – $12,000 |
| Stamped + color + border | $13 – $18+ | $10,400 – $14,400+ |
| Asphalt (for comparison) | $3 – $7 | $2,400 – $5,600 |
💡 Pro Tip: Always request an itemized quote from any contractor. It should list concrete PSI spec, base depth, reinforcement type, slab thickness, and finishing method. Quotes missing these details are a red flag — you won’t know what you’re actually getting until problems appear months later.
Concrete Driveway Installation: The Nine-Phase Process
Understanding how a proper concrete driveway installation unfolds helps you recognize quality work — and spot the shortcuts that lead to premature failure. Below is the process I follow on every project, refined over hundreds of installations.
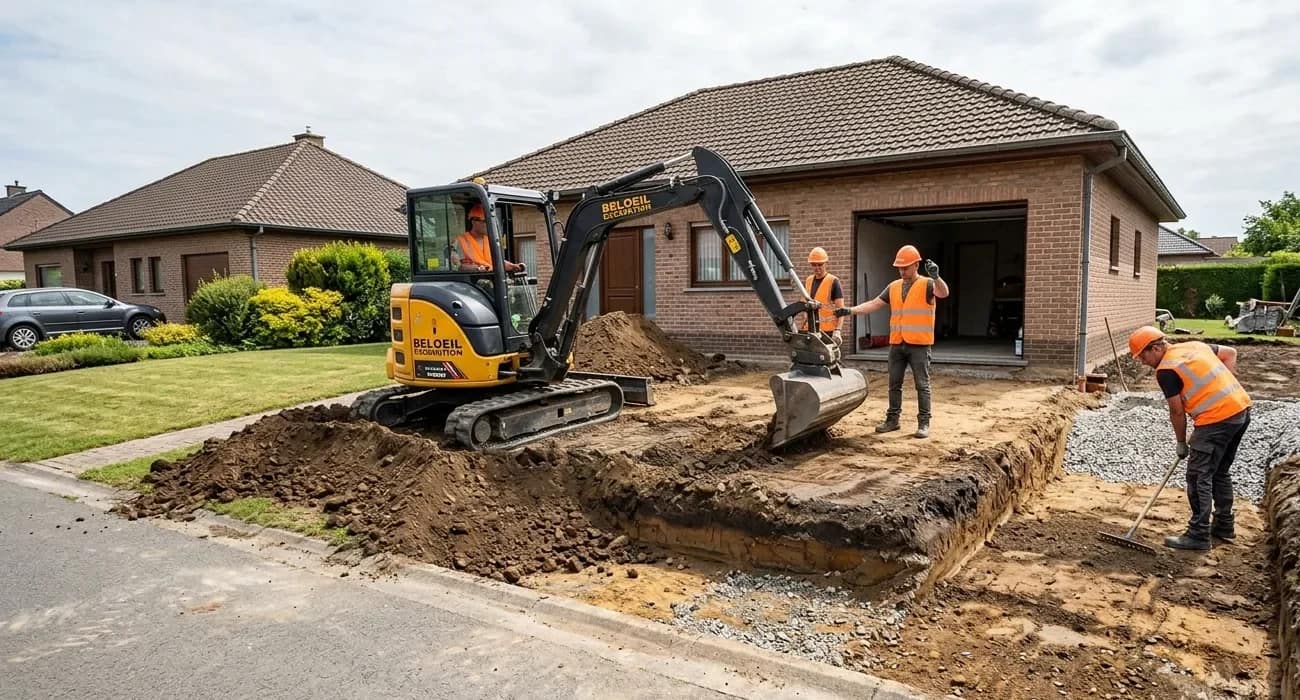
Phase 1: Site Preparation and Demolition
Every project starts with clearing the site. For replacement jobs, this means breaking up and hauling away the existing surface using excavators or skid steers. Old material gets removed entirely rather than buried on-site — buried debris creates settling problems that show up as cracks and depressions within just a few years.
Phase 2: Excavation and Rough Grading
Once the site is clear, excavation begins. For a standard 4-inch concrete slab over a 6-inch gravel base, we excavate roughly 10 to 12 inches below the finished grade. Laser levels and string lines establish correct slope — a minimum of 2% (a quarter inch drop per foot) away from the house. Getting grade right here prevents drainage problems that are nearly impossible to fix after concrete is poured.
Phase 3: Base Installation and Compaction
This is where most concrete driveway failures are either prevented or guaranteed. I install 4 to 6 inches of ¾-inch crushed gravel in 2-inch lifts, compacting each lift thoroughly with a vibratory plate compactor. Proper base preparation adds $1 to $2 per square foot to the project but prevents 40 to 50 percent of all concrete driveway failures I’ve seen in the field. Shortcuts here — thin base, poor compaction — lead to settling and cracking within two to five years.
For detailed drainage strategies I use alongside base prep, see our guide on preventing driveway water damage.
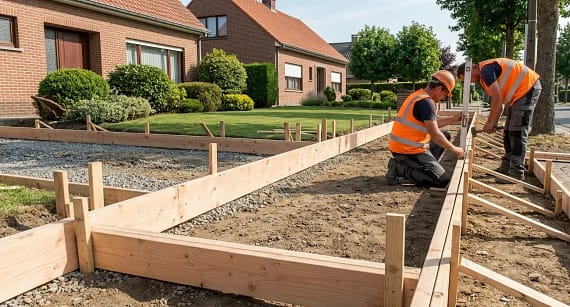
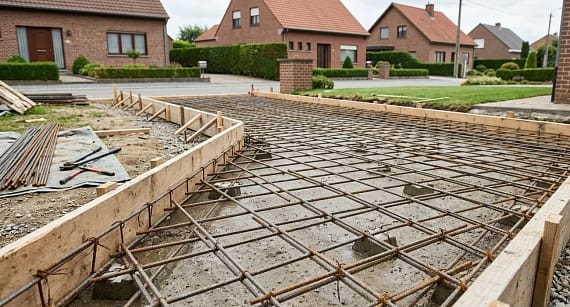
Phase 4: Formwork and Reinforcement
Wooden or steel forms are set along the perimeter of the driveway. Before concrete arrives, reinforcement goes in — wire mesh, rebar, or fiber. The key detail most people miss: reinforcement must be elevated to sit in the middle third of the slab, not lying flat on the ground. The mesh is flat on the base, which provides almost zero tensile strength. I use chairs or dobies to hold it at the proper height.
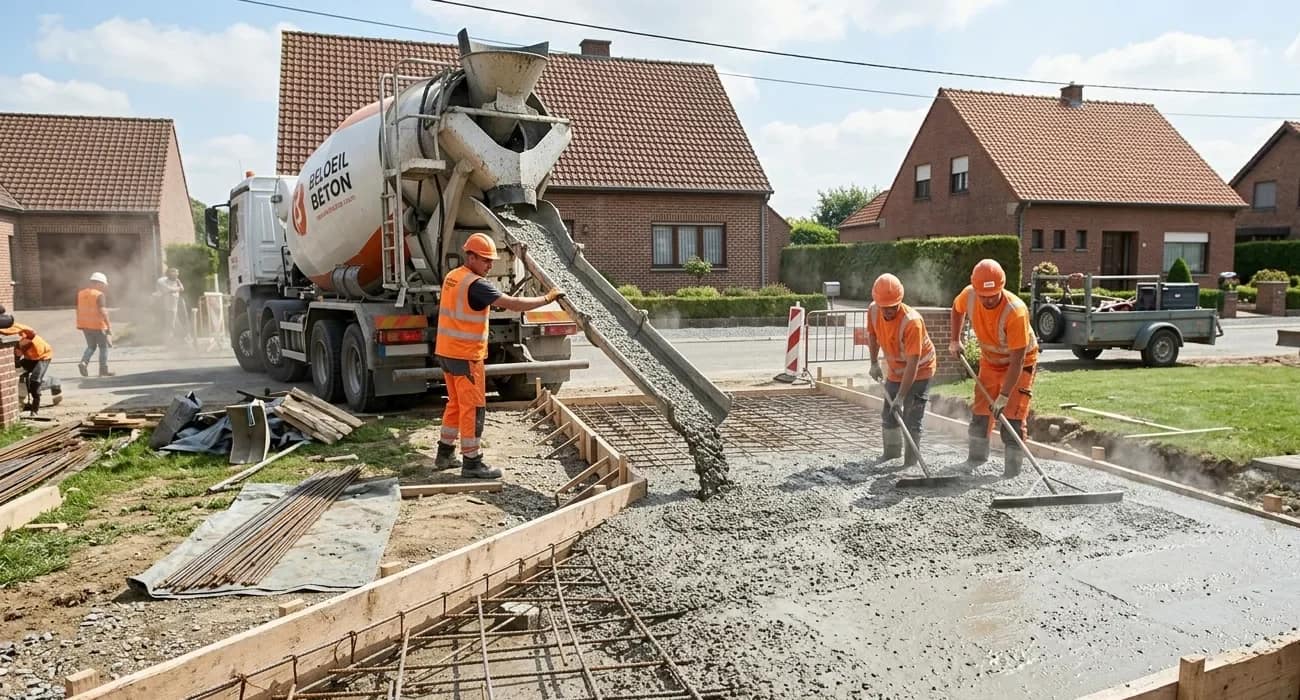
Phase 5: Concrete Ordering and Logistics
Concrete is ordered from a local ready-mix supplier, specified by PSI (minimum 3,000 for residential), air content (5 to 7% for freeze-thaw climates), and slump (4 to 6 inches for workability). For that 800-square-foot driveway at 4 inches thick, I typically order 10 cubic yards with a small overage. Truck access to the site matters — if trucks can’t reach the pour location, we need a pump, which adds $150 to $300 per hour.
Phase 6: Placement and Finishing
Once the truck arrives, the clock is running. Workers direct concrete into forms, rake it to even depth, and consolidate it around reinforcement using vibrators. Screeding levels the surface, bull floating smoothes it further, and as the concrete begins to stiffen, final finishing begins. Broom finishing adds texture for traction. Decorative stamping happens in this window too. Control joints are cut or formed at intervals of 10 to 15 feet to guide any future cracking into predictable lines.
Phase 7: Curing
Curing is where patience pays off — and where impatient homeowners cause expensive, permanent damage. Concrete needs moisture to cure and develop strength. I apply curing compound immediately after finishing or cover the slab with polyethylene sheeting. No traffic for the first seven days — no exceptions. Light vehicles can use the driveway after seven days, but full strength isn’t reached until 28 days.
Phase 8: Form Removal and Joint Sealing
Once initial curing is established — usually three to seven days — forms are removed carefully to avoid chipping edges. Control joints and perimeter gaps are then cleaned and filled with flexible polyurethane or silicone sealant. This step costs $1 to $3 per linear foot but prevents the water infiltration that drives freeze-thaw damage in cold climates.
Phase 9: Final Grading and Cleanup
Surrounding areas disturbed during construction — lawn edges, planting beds, adjacent pavement — are regraded and restored. The driveway is cleaned of any construction residue. After 28 days, a light pressure wash is appropriate if needed.
💡 Pro Tip: Schedule summer concrete pours for 6 to 8 AM. This gives your crew the coolest part of the day — typically four to six hours before peak afternoon heat makes finishing difficult and can compromise the slab’s long-term strength.
Concrete Driveway Thickness: Getting the Spec Right
Concrete driveway thickness is one of those specs where underspending creates disproportionate consequences. Here’s the guide I use with every client:
- 4 inches: Standard for passenger vehicles, sedans, small SUVs, and light trucks up to about 6,000 lbs GVW.
- 5–6 inches: Required for heavier trucks, full-size pickup trucks with payloads, large SUVs, and vehicles in the 6,000–12,000-lb range.
- 6–8 inches: Necessary for RVs, boat trailers, commercial vehicles, or any application where vehicles consistently exceed 10,000 lbs.
Upgrading from 4 to 6 inches adds roughly $1,600 to $2,400 for a standard driveway. Compare that to the $4,000 to $8,000 cost of replacing a slab that failed under loads it couldn’t handle, and the math becomes straightforward.
Control joints should be spaced no more than 2.5 times the slab thickness in feet — so every 10 feet for 4-inch slabs and every 12 to 13 feet for 5-inch slabs. Joint depth should equal one-quarter of slab thickness. These joints don’t prevent cracking — concrete always wants to crack — but they direct cracks into straight, controlled lines that are easy to seal rather than irregular patterns that become structural problems.
Concrete vs Asphalt Driveway: The Real Comparison
I’ve installed hundreds of both, and here’s my honest assessment — no agenda attached.
| Factor | Concrete | Asphalt | Winner |
|---|---|---|---|
| Upfront cost | $6–$12/sq ft | $3–$7/sq ft | 🏆 Asphalt |
| Lifespan | 30–40 years | 15–20 years | 🏆 Concrete |
| Maintenance cost | $300–500 / 3–5 yrs | $800–1,500 / 2–3 yrs | 🏆 Concrete |
| Heat performance | Excellent — won’t rut | Can soften, rut | 🏆 Concrete |
| Ease of repair | Skilled work needed | Straightforward patching | 🏆 Asphalt |
| Aesthetics | Stamped, colored, exposed agg. | Black only | 🏆 Concrete |
| 30-yr total cost | Lower overall | Higher due to replacement | 🏆 Concrete |
For climate-specific recommendations and lifetime cost modeling, see our full asphalt vs concrete driveway breakdown.
Stamped Concrete Driveways: When Aesthetics Matter
Stamped concrete driveways have become one of the most requested finishes I install — and for good reason. Done well, stamped concrete looks like natural stone, brick pavers, or reclaimed tile without the maintenance headaches or settlement issues that come with actual pavers.
The process involves pressing textured mats or rollers into freshly placed concrete before it fully sets, creating surface patterns. Color is applied via integral pigments mixed before pouring, dry shake color hardeners broadcast during finishing, or stains applied after curing. A release agent prevents the stamping tools from bonding and adds a secondary color for depth and realism.
Common patterns I install include random slate, European cobblestone, ashlar cut stone, wood plank, and geometric tile designs. Pricing ranges from $10 to $12 per square foot for simpler patterns to $13 to $15 for complex designs requiring multiple stamp mats and color layers.
Maintenance for stamped concrete differs slightly from plain concrete. The surface sealer — typically an acrylic or polyurethane product — needs reapplication every one to three years depending on traffic and climate. Without regular sealing, color fades and the surface becomes vulnerable to staining. With proper care, stamped concrete driveways hold their appearance for decades.
💡 Pro Tip: Before committing to a stamped pattern, visit an actual installed project that’s at least two to three years old. Patterns that look striking in photos can feel overwhelming at full driveway scale. A real-world view of an aged, weathered installation tells you far more than a showroom sample ever will.
Concrete Driveway Maintenance: Protecting Your Investment
One of concrete’s biggest advantages over asphalt is how genuinely low-maintenance it is — but “low maintenance” doesn’t mean “no maintenance.” Here’s what I recommend to every homeowner after installation.
Routine Cleaning
Pressure wash twice a year — spring and fall. Use 2,500 to 3,000 PSI with a 15 to 25-degree nozzle held 12 to 18 inches from the surface. Tighter angles or closer distances can etch the concrete. During the wash, inspect for cracks, joint deterioration, or surface scaling that needs attention before it worsens.
Sealing
Apply a penetrating silane/siloxane sealer every three to five years. These sealers work by penetrating the concrete matrix and creating water repellency from within — no surface film that can peel or discolor. For decorative concrete, acrylic sealers enhance color and add gloss and need reapplication every one to three years.
For an 800-square-foot driveway, professional sealing runs $400 to $800. DIY sealing with a quality product and a roller costs $150 to $300 — the highest-return maintenance task you can do on a concrete surface.
Joint Maintenance and Crack Repair
Control joints should be cleaned annually and resealed every three to five years using flexible polyurethane or silicone. For cracks wider than a quarter inch, route the crack to a uniform width and depth before filling with flexible crack filler. Prompt attention keeps cracks from expanding into structural problems.
See our complete driveway crack repair guide for step-by-step methods by crack type.
Winter Care
This is where most homeowners inadvertently cause damage. Deicing salts — sodium chloride, calcium chloride, magnesium chloride — cause surface scaling, especially in the first year. Avoid deicers entirely during year one. After year one, use them sparingly and sweep residue off promptly. Rinse thoroughly in early spring.
Safer traction alternatives include sand, chicken grit, and calcium magnesium acetate (CMA). CMA is concrete-safe but costs more than standard rock salt — worth it for decorative or high-end installations.
Traffic Management
Avoid repeatedly parking the same heavy vehicle in identical spots. For homeowners storing RVs on the driveway long-term, place rubber pads or plywood under jack stands to distribute point loads across a wider area of the slab.
💡 Pro Tip: Set calendar reminders for biannual pressure washing, triennial sealing, and annual joint inspection. Scheduled maintenance gets done. Maintenance you plan to do “when you get around to it” rarely happens — until you’re facing a repair bill that makes the missed upkeep look very inexpensive by comparison.
8 Common Concrete Driveway Mistakes — and How to Avoid Them
After 20 years in the industry, the same failures keep showing up. Here are the eight I see most often — and what to do instead.
1. Skimping on Base Preparation
Responsible for 40 to 50 percent of premature failures. Thin or poorly compacted gravel leads to settling, which leads to cracking. Non-negotiable: 4 to 6 inches of compacted crushed gravel, placed in 2-inch lifts and properly compacted at each lift.
2. Ignoring Drainage
Water that pools on or infiltrates beneath a concrete slab destroys it systematically — especially in freeze-thaw climates. Every driveway needs a minimum 2% slope away from structures and a plan for water that collects at low points. Poor drainage causes the majority of serious concrete driveway failures I’ve investigated.
3. Inadequate or Misplaced Reinforcement
Wire mesh lying flat on the base provides almost no benefit — it needs to be elevated into the middle third of the slab. Skipping reinforcement entirely is how you get a slab that cracks through completely rather than just surface-crazes. The cost is $0.30 to $1.50 per square foot; the cost of not doing it is far higher.
4. Wrong Thickness for the Load
A 4-inch concrete under a 12,000-pound RV is a time bomb. Specify thickness based on your heaviest regular vehicle, not your lightest.
5. Missing or Misspaced Control Joints
Without joints, concrete cracks randomly. With joints spaced too far apart, it still cracks randomly between them. Maximum spacing: 2.5 times the slab thickness in feet. Depth: one-quarter of slab thickness.
6. Driving on Fresh Concrete Too Early
Surface appearance has nothing to do with structural readiness. Concrete looks set long before it is. Seven days minimum before any vehicle use. Twenty-eight days before heavy vehicles. I’ve seen homeowners permanently damage slabs by driving on 4-day-old concrete because it “looked dry.”
7. Pouring in Unsuitable Weather
Below 50°F or above 85°F ambient temperature, concrete work is risky. Rain within 24 hours of a pour can ruin surface quality. Check the seven-day forecast before scheduling any concrete work. If conditions are marginal, reschedule — the delay costs nothing compared to a compromised pour.
8. Over-finishing the Surface
Working the surface too much or too early brings water and cement paste up, creating a weak top layer that scales and dusts. This is especially common with DIY projects where crews try to rush or “perfect” the surface past what the concrete wants to give.
DIY vs Professional Installation: An Honest Assessment
I’m going to be direct here, even if it costs me business to say it: most homeowners should not attempt full DIY concrete driveway installation for a primary driveway. Here’s why.
You’re working with 8 to 12 cubic yards of material that begins setting within two to four hours, cannot be meaningfully corrected once hardened, and requires a coordinated crew of four to six people working in sync. Equipment rental runs $500 to $1,500 assuming availability on your schedule. Concrete arrives by truck and must be placed immediately.
DIY materials for an 800-square-foot driveway cost $2,800 to $4,500. Professional installation costs $4,800 to $6,400. The savings — $1,000 to $2,000 — evaporate completely if a finishing error, drainage mistake, or base problem requires professional correction. Those fixes routinely run $3,000 to $6,000.
That said, a hybrid approach works well for motivated homeowners. Handle site clearing, rough excavation, and form installation yourself — saving $1,500 to $3,000 in labor — then hire professionals for concrete placement and finishing. You capture savings without gambling on the most skill-dependent, time-sensitive part of the project.
💡 Pro Tip: If you’re going partial DIY, hire a professional concrete finisher as a day consultant for the pour. Paying $500 to $1,000 for an experienced finisher to oversee placement and finishing prevents the most common and costly DIY errors while still leaving meaningful savings on the prep side.
How Long Does a Concrete Driveway Last?
The short answer: 30 to 40 years when properly installed and maintained. The longer answer involves understanding what actually drives longevity.
Installation quality is the dominant factor. I’ve inspected concrete driveways from the 1960s still in excellent service. I’ve also seen driveways from the 2010s requiring replacement because of inadequate base prep, wrong thickness, or poor curing. The concrete mix itself matters, but installation quality matters more.
Climate is the second major factor. Freeze-thaw climates are harder on concrete than moderate ones. Properly air-entrained concrete in northern climates still regularly hits 30-year lifespans, but it requires diligent maintenance — particularly keeping deicing salts off the surface and ensuring joints stay sealed.
Maintenance habits are the variable homeowners control most directly. Driveways that get pressure washed, sealed, and have cracks addressed promptly routinely outlast neglected driveways by 10 to 15 years. That difference represents $8,000 to $15,000 in avoided replacement costs.
Load patterns matter too. A driveway regularly supporting 12,000-pound RVs that was poured at 4 inches thick won’t see 30 years. One properly sized for its loads, with joints maintained and sealer applied on schedule, can easily hit 40 to 50 years.
FAQ About Concrete Driveways
Can I pour concrete directly over dirt?
No — and this is one of the most expensive shortcuts homeowners take. Concrete poured over native soil without a prepared gravel base settles unevenly, cracks, and typically fails within one to two years. The gravel base provides drainage, distributes loads, and prevents soil moisture changes from moving the slab. Always excavate and install compacted gravel before pouring. Proper base prep adds $800 to $1,600 for a typical driveway but prevents failures costing $6,000 to $10,000 to correct.
What is the minimum concrete driveway thickness for residential use?
Four inches is the minimum for standard passenger vehicles. Six inches for anything heavier — pickup trucks with payloads, RVs, boats, commercial vehicles. I’ve repaired dozens of 4-inch slabs that failed under loads they were never designed to carry, at repair costs far exceeding the original upgrade price.
How soon can I drive on new concrete?
Seven days minimum for light passenger vehicles. Heavy vehicles should wait 10 to 14 days. Full design strength isn’t reached until 28 days. The surface looks and feels solid long before it’s structurally ready for traffic — resist the temptation to drive on it early.
Do I need to seal a concrete driveway?
Sealing isn’t strictly required, but it significantly extends lifespan and reduces long-term maintenance costs. I recommend a penetrating silane/siloxane sealer every three to five years. In northern climates with freeze-thaw cycles and road salt use, sealing is close to essential — it dramatically reduces water infiltration and surface scaling over time.
How much does a two-car concrete driveway cost?
For a standard 20 x 40-foot (800 square foot) two-car driveway, expect $4,800 to $6,400 for a basic broom-finished installation, or $8,000 to $12,000 for decorative finishes with stamping and color. Site conditions, existing driveway removal, and drainage requirements can push costs significantly higher. Always budget a 10 to 15% contingency for unexpected conditions.
Is concrete or asphalt better in cold climates?
Both work well in cold climates with proper installation. Concrete requires an air-entrained mix — 5 to 7% air content — for freeze-thaw resistance. Asphalt has slight flexibility advantages in extreme cold but demands more frequent maintenance. In my experience, properly installed concrete performs comparably or better over its full lifespan even in northern markets.
What causes concrete driveways to crack?
The most common causes are inadequate base preparation leading to settlement, missing or misspaced control joints, insufficient thickness for vehicle loads, freeze-thaw cycles without proper air entrainment, and tree roots growing beneath the slab. Most cracking is preventable through proper installation — which is exactly why choosing the right contractor matters so much.
How long does concrete driveway installation take?
For a standard residential driveway, the physical installation spans three to five days — one to two days for excavation and base prep, one day for forming and reinforcement, one day for the concrete pour and finishing. Add seven days of curing before light traffic, and 28 days before the driveway is truly at full strength. Larger or decorative projects take longer.
Making the Right Decision for Your Property
After two decades of working with driveways across every climate and budget range, here’s the simplest framework I can offer: if you’re planning to stay in your home for more than five to seven years, a concrete driveway almost always makes financial and practical sense. If you’re on a tight near-term budget and may sell within a few years, asphalt’s lower upfront cost might be more appropriate for your situation.
For most homeowners, though, concrete represents what I’d describe as a generational investment. You pour it once, maintain it sensibly, and hand it off to the next owner in excellent condition — while your neighbor is on their second asphalt job and starting to think about a third.
The keys to a successful concrete driveway come down to four things: choosing a contractor who doesn’t cut corners on base prep or thickness, specifying the right mix for your climate and load conditions, giving it adequate time to cure, and committing to basic maintenance. Get those four things right, and you’ll be parking on that slab for the next 35 to 40 years without a second thought.
For more resources on driveway decisions — including detailed cost comparisons, contractor evaluation checklists, and climate-specific recommendations — explore our full library at The Asphalt Advisor.
Concrete Network – Driveway Resources
Bob Vila – Concrete Driveway Cost Breakdown